Saturday, 26 December 2009

drawing graphics for the iPhone (not opengl ES)

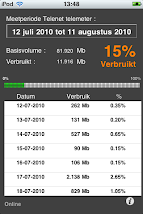
Don't we all want to make graphics like this : ?


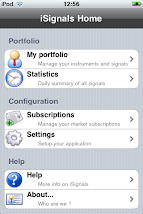
Well , I'll try to explain how I did this (BTW this graphics comes from my iphone application iSignals).

First create a file in your project which is a subclass of UIView (via XCode>File>New File). Call it for example MyGraphView. 

Then you create a XIB with Interface Builder , in the XIB you add a view and you change the class identity to the custom view class MyGraphView.

And now comes the coding part, lets for the sake of clarity say that you have 2 arrays in MyGraphView (usually you'll pass them via a controller class). These arrays are called datapoints[] and ylabels[].

So let's see how the drawRect method is implemented.

- (void)drawRect:(CGRect)rect {

    // Drawing code


float width =  rect.size.width ;

float height = rect.size.height ;

CGContextRef currentContext ;

int i = 0 ;


 // Get the graphics context that we are currently executing under

currentContext = UIGraphicsGetCurrentContext() ;

   ;


In the first lines of the drawRect, I save the width and the height, I'll use this to calculate the scale factors.

To understand this you need to know a bit of coordinatesystems. The iPhone coordinates are simply the pixels that can be drawn. So for example a view can be 200 px wide and 300 px high.

But of course what more important is , is the world coordinatessystem. And these coordinates are the coordinates of your world.

For example if I want to plot 600 points and the range of those points are between 0.5 and 3.5 then my user coordinatessystem is: X-axis =(0,600) Y-axis  = (0.5,3.5).


So to convert user points into iphone points (or view points) I need to apply a scale factor. The scale factor is calculated as follows.


#define OFFSET_X 30.0f

#define OFFSET_Y 10.0f 


scale_factor_x = ( width -  OFFSET_X ) / ( [dataPoints count] - 0 );

scale_factor_y =   (height - OFFSET_Y ) / (max_y - min_y ) ; // max_y = max(dataPoints) ;min_y = min(dataPoints)


Note: OFFSET_X and OFFSET_Y are 2 constants to let some space in the view where I can are  plot the axes and labels of the axes.


So let's draw the axes , please note that in this first version I don't use CGPath's , later I'll refactor the code and use CGPath's.

And also be aware that I use the default orientation and default location of the origin of the view ( point (0,0) is in the upper left corner).


// draw the axes

CGContextSetRGBStrokeColor(currentContext, 0.83, 0.83, 0.83, 0.7); // this is sort of gray

CGContextMoveToPoint( currentContext,   OFFSET_X, height - OFFSET_Y  );

CGContextAddLineToPoint( currentContext,   OFFSET_X, OFFSET_Y );

CGContextMoveToPoint( currentContext,   OFFSET_X, height - OFFSET_Y   );

CGContextAddLineToPoint( currentContext,   width, height - OFFSET_Y  );

CGContextStrokePath(currentContext);


And draw some gridlines


CGContextSetRGBStrokeColor(currentContext, 0.83, 0.83, 0.83, 1);

CGFloat len[] = {4,2} ;


CGContextSetLineDash( currentContext, 0, len, 2 ) ;

    for ( i = OFFSET_X ; i <= height ; i = i + OFFSET_X )

{

CGContextMoveToPoint( currentContext,   OFFSET_X, height - OFFSET_Y - i );

CGContextAddLineToPoint( currentContext,   width, height - OFFSET_Y - i);

}

CGContextStrokePath(currentContext);


And then draw the graph of datapoints


CGContextSetRGBStrokeColor(currentContext, 1.0, 0.65, 0, 1);

    UIImage *red = [UIImage imageNamed: @"red.png"] ;

UIImage *green = [UIImage imageNamed: @"green.png"] ;

CGPoint aPoint ;

// draw the history graph

for( i = 0 ; i< [dataPoints count] ; i++ )

{

x =  OFFSET_X +    i * scale_factor_x ;

old_y = [[dataPoints objectAtIndex: i]  floatValue];

y =   (height -OFFSET_Y) - ([[dataPoints objectAtIndex: i]  floatValue] - min_y) * scale_factor_y ;


if ( old_x < 0 )

{

CGContextMoveToPoint( currentContext,   x, y  );

old_x = x ;

}

else

{

old_x = x ;

CGContextAddLineToPoint( currentContext,   x, y );

}


}

CGContextStrokePath(currentContext);


And now I show you how to add text in the graph (drawing the Y-labels, I will not give the code for the X-labels).


        // this is for the font

CGContextSetRGBStrokeColor(currentContext, 1, 1, 1, 1);

CGContextSetRGBFillColor(currentContext, 1.0, 1.0, 1.0, 0.8);

CGContextSelectFont(

currentContext,

"Helvetica-Bold",

FONT_SIZE,

kCGEncodingMacRoman

);

        // this transformation is to make sure that the text is written in the right direction

CGAffineTransform transform = CGAffineTransformMake(1.0,0, 0.0, -1.0, 0.0, 0.0);


        CGContextSetTextMatrix(currentContext, transform);

CGContextSetTextDrawingMode(currentContext, kCGTextFill);


// set Y-labels

float j1 = min_y ;

float step = (max_y - min_y)/ 7.0f ; // 7 labels

for ( i = 0.0f ; i <=height ; i = i + OFFSET_X )

{

  // set the precision of the label

if ( j1 > 999.0f )

{

    s1 = [NSString stringWithFormat:@"%4.0f", j1] ;

}

else

{

    s1 = [NSString stringWithFormat:@"%4.2f", j1] ;

}

j1 += step ;

CGContextShowTextAtPoint( currentContext,0 , height - OFFSET_Y - i , [s1 UTF8String] , [s1 length] ) ;


}


CGContextStrokePath(currentContext);


Voila this was it, next time I'll refactor the code and use Paths instead of each time saving and restoring the context


Friday, 4 December 2009

Its finally there

After months of hard work and a long review process by Apple, my first iPhone application is finally accepted on the AppStore.

iSignals, for the active investor. This application integrates with an proprietary investment engine , this investment engine holds a computer-generated portfolio with more than 17000 equities on 28 different stockmarkets and with 9 years of historical data. 

On the daily basis the engine generates computer managed portfolios with buy&sells of those equities (portfolio's are organized per market).

The engine is based on a combination of technical analysis models, artificial intelligence (pattern detection) and a neural network.


Via iSignals the user can subscribe to one or more computer managed portfolio's and as such receiving the buy/sells from the engine.


The user can now use those computer generated signals as a guidance in his investment decisions.


The advantage of the application is that the user can consult the engine's portfolio's wherever he wants and whenever he wants. The user can also consult quote data for each instrument (data from finance.yahoo.com) on his iPhone/iPod Touch.


You can find it here

Friday, 31 July 2009

iPhone SMS hack

I 've downloaded the PDF file that explains in full detail the SMS hack.

You can find it here : SMS hack.pdf

Now 4 caveats :

1) They tested it in lab environment, so not by sending real SMS's over a carrier (because that cost money :-) )

2) If some hacker really wants to exploit this he will need a lot of phonenumbers (and cash to send the SMS)

3) The hacker his identity will be quickly revealed as sending of SMS is not anonymous at all.

4) The only thing that the paper described is how to crash an iPhone (and Android GSM) not really taking over the thing. It will be a hard thing to do to really send a program over a carrier via SMS to actually take over an iPhone or an Android GSM 

Saturday, 25 July 2009

iPhone user experience

For those developing for the iPhone and struggeling with the UI, I found here a cool article : http://www.smashingmagazine.com/2009/07/21/iphone-apps-design-mistakes-overblown-visuals/

Tuesday, 21 July 2009

Multitasking for the iPhone: something simple

We all known that the iPhone/iPod has a much slower CPU than a 'standard' Mac or PC. So this means that the user experience can be a bit sluggish.
So when we have for example a time consuming task it comes in handy to use some multi-tasking capabilities built in , in Cocoa Touch.

However ,  I found out for myself a simpler and less difficult method of giving the user a good experience and still doing a lengthy task.
Of course this method only applies to tasks which takes 2-4 seconds , for longer tasks you'll need NSThread.

The trick I do is that I use an UIActivityIndicatorView somewhere on the screen so when a user 'sees' the screen he in fact see the spinning gear.
In the mean time the implementation of the time consuming task I do in the viewDidAppear: method.

So what happens is that the user sees a UI with something moving (the gear) so he knows that the application is actually doing something, and if it only takes 2 to 4 seconds he will never get frustrated.

I found this much easier than going to the route of NSThread with all the difficulties of locking of shared variables etc.