Tuesday 27 January 2009

Drawing in views

For the people lookin for information on how to draw for the iPhone must look here

Drawing in Cocoa is simple (NOT).

In fact each object on the screen can be seen as a view and each view has a method named drawRect: (Rect) that is called each time when a view need to be (re)drawn. For example in the case of a resize, a maximize window etc.

Most people will then use a path to do the actual drawing (by using an instance of the class NSBezierPath).

Now a simple example to show how to draw in Cocoa.

First start a new project and open the Interface Builder. From the controls window , select the 5th item (this contains custom view, image view etc).
Click on custom view and drag it to the window :


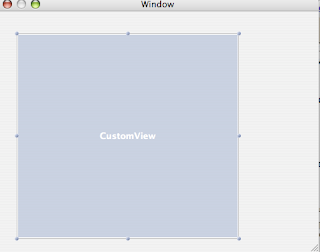
Now in XCode you have to define a class which will be associated with this custom view.
You do this by selecting XCode>File>New File, then a popup will show in which you select 'objective-c class subclass NSView'.

Give your new class a name, when you open the .m file you'll see that XCode generated 2 methods : drawRect and initWithFrame.

Now go back to the Interface Builder and drag the .h file from you freshly created class to the MainMenu.nib window. By doing this you have informed the interface builder that their is a new view class.

In a last step you have to associate the CustomView with the view class.

You do this by opening an Inspector on the customview and changing the custom class.


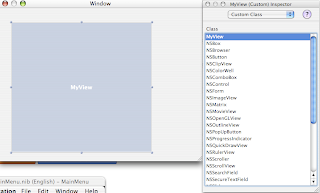
So now we are done in the IB, save and close it. And do a build and go.

And you see an empty window, of course because we didn't do anything yet.

To actually draw something you have to implement the drawRect method of your custom view class :

// Drawing code here.

 
// Set the color in the current graphics context for future draw operations
[[NSColor blackColor] setStroke];
[[NSColor yellowColor] setFill];


// Create our drawing path

NSBezierPath* drawingPath = [NSBezierPath bezierPath];

// draw a rectangle

[drawingPath appendBezierPathWithRect: rect];

// actually draw it
[drawingPath stroke] ;

// and fill it
[drawingPath fill] ;


The above source code lines gives an example of what can be in a drawRect method.
What it does is in fact drawing a rectangle and fill it with color yellow.
Now as already said , each time an event happens to a view the drawRect method will be called for each view.

Sometimes we want to draw a grid, some explanation and source code can be found here ,
I also looked at the different ways to draw rectangles.

The Matrix: revisited

One important class is still missing from the matrix implementation: the enumerator.
An enumerator is in my opinion , a workaround for the fact that the concept of 'BLOCKS' are missing in Objective-C.
If it was possible to use blocks like , for example, in Smalltalk then enumerators would be useless.

In this case I made a subclass of the abstract class NSEnumerator and called it MatrixEnumerator.
The protocol definiton of NSEnumerator obliges us to implement 2 methods ( nextObject and allObjects ).

I've added one more method and that is setTraversalOrder: ; with this method you can specify how the traversal will take place (by row first then by column or by column first then by row).

A new version of the Matrix project (including the enumerator) can be found here
Some extra functionality is also added to the Matrix class, it's now possible to get a row or a column from a matrix. Note that the rows or columns are copies from the original matrix.

Tuesday 20 January 2009

The Matrix

I do not understand why Apple (or NeXt) didn't include a Matrix class in their foundation classes.
In gaming applications it would be very handy to have a 2-dimensional (or 3-dimensional) data structure.

Of course when I talk about a Matrix I don't mean the mathematical variant, therefore you can find much more performant implementations; but for the more common things like cell's on a board, I made my own Matrix class.

This first version is a very simple one, the underlying idea is to have an array of arrays. So a NxM matrix is implemented as a an array with N elements where each element is again an array of M elements.

Of course everything is kept simple now, in a latter version I'll more functions (like row access, column acces, transpose, copy, better initialization etc) and I'll add more complex things like SparseMatrix, Vectors, MatrixEnumerator etc.

I'll show now some code snippets , the full version can be downloaded here.

1. Matrix initialization


storage = [NSMutableArray arrayWithCapacity: j ] ;
for ( x = 0 ; x<=j ; x++ )
{

[storage insertObject: [NSMutableArray arrayWithCapacity: i ] atIndex: x] ;

for ( y = 0 ; y <= i ; y++)
{
// initialize each element with something
[[storage objectAtIndex: x]
insertObject: @"" atIndex: y ] ;

}
}


In the above snippet you see the initialization of a Matrix of size IxJ , as underlying datastructure I'll use the NSMutableArray.
Note that this initialization is oke for small matrices, and is usefull to be used in applications like chess or checkers.

2. Accessors for Matrix

Unfortunealy we don't have operator overloading like we have in C++ , but anyway. To access the elements of a matrix we have 2 accessors (a specialized get and set so to say).

- (void) atX: (int ) i atY: (int ) j put: (id) obj
{
//...
// store an element in the storage room
[[storage objectAtIndex: j]

replaceObjectAtIndex: i withObject: obj] ;
}


- (id) atX: (int ) i atY: (int ) j
{
//...
// get an element from the storage room
return [[storage objectAtIndex: j] objectAtIndex: i] ;

}


Now so far a basic matrix structure. Next time I'll go for some more advanced functions and structures.

Thursday 15 January 2009

Game of life

My own Game of Life (based on John Conway's game) is almost finished .

It just need some polishing and then done.

In a next message I'll explain how I started to implement a Matrix class. I developed it to have a generic datastructure to hold my cells.

Saturday 10 January 2009

SimpleCalculator

Let's move on and implement a somewhat more complex application.
(for the impatients : you can download the source code here ; don't forget to change the project settings in XCode before you compile).

I will now implement a simple calculator (see image) which is in fact an implementation of the MVC design pattern.


Now first a few words on MVC, the Model -View-Controller design pattern is probably one of the oldest design pattern around and mostly used to develop GUI's.
The idea is that you seperate the representation (UI) from the domain model and the interactions of the GUI with the model is implemented in the controller.

This has the advantage that for example you can have several visual representations of the same model.

So step 1 is to define the model :

/* CalculatorModel */

#import

@interface CalculatorModel : NSObject
{

float value1 ;
float value2 ;
float result ;

float memory ;

int depth ;

}

- (void) push:(float) v ;
- (void) clear ;
- (float) result ;
- (void) plus ;
- (void) min ;
- (void) mul ;
- (void) div ;
- (void) memoryPlus ;
- (void) memoryMin ;
- (void) memoryClear ;
- (float) memory ;
@end


And the corresponding implementation

#import "CalculatorModel.h"

@implementation CalculatorModel

- init
{
[super init] ;
depth = 0 ;
value1 = 0 ;
value2 = 0 ;
memory = 0 ;
//NSLog(@"Init calculator model" ) ;

return self ;
}

- (void) memoryPlus
{
memory += result ;
}

- (void) memoryMin
{
memory -= result ;
}

- (void) memoryClear

{
memory = 0 ;
}

- (float) memory
{
return memory ;
}

- (void) push:(float) v
{

if ( depth == 0 )
{
depth = 1;
value1 = v ;
}
else
{
depth = 0 ;
value2 = v ;
}
}
- (void) clear ;
{
depth = 0 ;
value1 = 0.0 ;
value2 = 0.0 ;
}

- (float) result
{
return result ;
}

- (void) plus
{

result = value1 + value2 ;

}
- (void) min
{

result = value1 - value2 ;

}
- (void) mul
{
result = value1 * value2 ;


}
- (void) div ;
{
if (value2 > 0 )
{
result = value1 / value2 ;
}
else result = 9999999999.0 ;


}


@end


So now we have our CalculatorModel. As you can see a very basic calculator. You have the basic calculations and a memory . I already provided a stack (with depth 1) to extend it later to a complex calculator model.

The next step is to build the view. This view  (see picture above) is designed using the InterfaceBuilder, but before we can associate the actions we need to create the controller also.

As already explained : in the controller we define the actions and the outlets which are bound to UI objects in the view (the bindings is done via the InterfaceBuilder)

The definition of the controller looks like this :

/* SimpleCalculatorController */

#import
#import "CalculatorModel.h"

@interface SimpleCalculatorController : NSObject
{
IBOutlet NSTextField *display ;
CalculatorModel *calculator ;
bool hasDecimal ;
bool afterCalculation ;
int action ;

NSMutableString *value ;
}
- (void) genericPush:(int) digit ;
- init ;

- (IBAction) pushOne:(id) sender ;
- (IBAction) pushTwo:(id) sender ;
- (IBAction) pushThree:(id) sender ;
- (IBAction) pushFour:(id) sender ;
- (IBAction) pushFive:(id) sender ;
- (IBAction) pushSix:(id) sender ;
- (IBAction) pushSeven:(id) sender ;
- (IBAction) pushEight:(id) sender ;
- (IBAction) pushNine:(id) sender ;
- (IBAction) pushZero:(id) sender ;
- (IBAction) pushDecPoint:(id) sender ;

- (IBAction) pushPlus:(id) sender ;
- (IBAction) pushMin:(id) sender ;
- (IBAction) pushMul:(id) sender ;
- (IBAction) pushDiv:(id) sender ;


- (IBAction) pushResult:(id) sender ;

- (IBAction) pushMemoryAdd:(id) sender ;
- (IBAction) pushMemoryMin:(id) sender ;
- (IBAction) pushClearMemory:(id) sender ;
- (IBAction) pushRecallMemory:(id) sender ;

- (IBAction) pushClear:(id) sender ;
@end


The corresponding implementation is the following :

#import "SimpleCalculatorController.h"


@implementation SimpleCalculatorController

- init
{
[super init] ;


value = [ [NSMutableString alloc] init] ;
[value appendString: @"" ] ;
calculator = [ CalculatorModel alloc] ;
hasDecimal = false ;
afterCalculation = false ;

return self ;
}

- (void) pushToCalculator
{

NSNumber *number ;
number = [[[NSNumberFormatter alloc] init] numberFromString: value] ;
[calculator push: [number floatValue ]] ;

value = [ [NSMutableString alloc] init] ;

hasDecimal = false ;
}

- (void) genericPush:(int)digit
{


if ( afterCalculation )
{
afterCalculation = false ;
value = [ [NSMutableString alloc] init] ;
}

if ( value == nil ) NSLog( @"NIL") ;
[value appendString: [NSString stringWithFormat: @"%d", digit]] ;
[display setStringValue: value ] ;

}


- (IBAction) pushOne:(id) sender
{
[self genericPush:1] ;
}

- (IBAction) pushTwo:(id) sender
{
[self genericPush:2] ;
}

- (IBAction) pushThree:(id) sender
{
[self genericPush:3] ;
}

- (IBAction) pushFour:(id) sender
{
[self genericPush:4] ;
}

- (IBAction) pushFive:(id) sender
{
[self genericPush:5] ;
}

- (IBAction) pushSix:(id) sender
{
[self genericPush:6] ;
}

- (IBAction) pushSeven:(id) sender
{
[self genericPush:7] ;
}

- (IBAction) pushEight:(id) sender
{
[self genericPush:8] ;
}

- (IBAction) pushNine:(id) sender
{
[self genericPush:9] ;
}

- (IBAction) pushZero:(id) sender
{


[self genericPush:0] ;
}

- (IBAction) pushDecPoint:(id) sender
{
if (hasDecimal) return ;
hasDecimal = true ;
[value appendString: @"."] ;
[display setStringValue: value ] ;

}

- (IBAction) pushPlus:(id) sender

{
[self pushToCalculator] ;
action = 1 ;

}
- (IBAction) pushMin:(id) sender
{
[self pushToCalculator] ;
action = 2 ;
}
- (IBAction) pushMul:(id) sender
{
[self pushToCalculator] ;
action = 3 ;
}
- (IBAction) pushDiv:(id) sender
{
[self pushToCalculator] ;
action = 4 ;
}


- (IBAction) pushResult:(id) sender
{
NSNumber *number ;
number = [[[NSNumberFormatter alloc] init] numberFromString: value] ;

[calculator push: [number floatValue ]] ;
if ( action == 0 ) return ;
if ( action == 1 )
{
[calculator plus] ;
}
if ( action == 2 ) [calculator min] ;
if ( action == 3 ) [calculator mul] ;
if ( action == 4 ) [calculator div] ;


value = [ [NSMutableString alloc] init] ;
hasDecimal = false ;
afterCalculation = true ;
action = 0 ;
[value appendString: [NSString stringWithFormat: @"%f", [calculator result]]] ;
[display setStringValue: value ] ;

}

- (IBAction) pushMemoryAdd:(id) sender
{
[calculator memoryPlus] ;
}
- (IBAction) pushMemoryMin:(id) sender
{
[calculator memoryMin ] ;
}
- (IBAction) pushClearMemory:(id) sender
{
[calculator memoryClear] ;
}

- (IBAction) pushRecallMemory:(id) sender
{
value = [ [NSMutableString alloc] init] ;
[value appendString: [NSString stringWithFormat: @"%f", [calculator memory]]] ;
[display setStringValue: value ] ;
}
- (IBAction) pushClear:(id) sender
{
[self init] ;
[display setStringValue: value ] ;
}


@end


Now this controller has a simple implementation, later on I'll revisit this controller to make it more cleaner.
To show how the view is build and bound to the controller I would like to show that via video or something. But that I still need to create.

So far the simple calculator application, it was very easy to build using XCode (it took me no more than a half a day). The reader will see that I didn't take much attention to memory management and so.
I come back to this later on, because memory management is important with larger and more complex applications


Monday 5 January 2009

Exceptions and the Lazy Programmer

Let's have a word on exceptions......

In other languages (no to mention Java), people are using Exceptions as way of doing error handling.
Now in Objective-C this surely not a good idea.
Because first of all its a very expensive mechanism in terms of CPU and memory stack (you should read the Apple documentation on it).
And secondly because it makes code difficult to read and to debug (try once to debug a program which is full of try/catch).

In my opinion Exceptions should only be used when things go really wrong and you need to stop (f.e: out of memory, disk crash etc).

I also developped a small Exception framework which I use in my daily coding. I'll publish it here (I'm gone try to use google docs to get things shared)


Sunday 4 January 2009

Oh yes !

In my company (AXA Bank Europe) we just went live with a new portfolio management system for our dealing room.
This has nothing todo with Objective-C, Apple or Cocoa (although the first version of the system was for Apple).
But for me its a big accomplishment !

(even worked on Sunday an Saturday to get things done).

BTW: the system calls Sophis and was a replacement for Opics, nowadays VMWare, Citrix and Informatica are no unknows anymore

A better event mechanism

I was thinking of implementing a new event mechanism (in fact based on what can be found in Smalltalk-80).

Is their anybody out there who did this ?

self = [super init], WTF ?!?

On the Net you can find a lot of debates if you can (or may) do the following in the init method of an object. (Remember, an instantiation message like [aClass new] will send the init message to your freshly created instance of aClass).

So is this method correct or not ?

- (id) init
{
    self = [super init] ;
   if ( self == nil ) return nil ;
   return self ;
}

From a syntical point of view its correct. But to me as an ex-Smalltalk programmer, its bogus (even from a conceptual view).

Because, think of it, why would you change yourself with something that's returned from initialization of an object of the superclass ?
Self is at the moment of initialization an instance of the whole classtree of the class you instantiate.
You can even introduce (unwanted) side effects with this construction.

Some comments on our first Objective-C program

In the first little program I use what is called instance methods and class methods.  The definition of these methods can be found in the .h files (interface), after the brackets ({}).
For example in the class Human you find a method - (NSString  *) name

The method declaration starts with a - (minus), this indicates an instance method. A method that starts with a + (plus) is a class method.
The typical usage of a class method is for instantiations of the class (new).

If you look again at above method, you must interpet this as a method name that returns a (NSString *).

If a method returns an id , then that means that it returns a generic object (= like a pointer to an object).

Another important language construct is the way to send messages, this is done using the square brackets syntax :

[self privateNew]

Above line means that the message privateNew is send to self.  (self = the current object or class).

Note that I use classes like NSString, NSException, NSObject etc. These classes are not part of Objective-C but are part of the so-called Foundation framework.
Apple delivers a lot of frameworks with XCode (like Cocoa, Carbon, OpenGL, Quartz, etc ).

The NSObject for example provides you with a number of methods you can use to instantiate objects, initialize them etc.

For example in the class Human for example I've overridden the new method so that nobody can make instances of the class Human.

Thursday 1 January 2009

Our first Objective-C program

Now we finally gone start.
First fire up XCode and create a new project, for the moment we don't gone use Cocoa , so you do the following : XCode>File>New Project and from the project wizard you select 'Command Line Utility;Foundation tool".
Give your project a name and we can start.

We will implement the classes I discussed before (Human, Male, Female) ; see previous blogmessages for this.

Now first of all in Objective-C a class has two parts , in the .h file you have the class definition (or interface) in the .m file you have the class implementation (or implementation).

(to create a class , select in XCode>File>New File , select Objective-C class and give it a name).

The first class we gone create is the Human class :
(sorry for the layout of the code, you can always sent me an email then I drop you the complete project via mail)

First we define the interface of the class (this is the Human.h file) :

#import
@interface Human : NSObject
{
NSString *name ; }
+ (id) new: (NSString *) s ;
+ (id) new ; + (void) privateNew ;
- (void) name: (NSString *) s ;
- (NSString *) name ;
- (BOOL) isFemale ;
- (BOOL) isMale ;
@end


And then we define the implementation of the Human class (.m file)

#import "Human.h"
@implementation Human
+ (id) new: (NSString *) s
{

[self privateNew] ;
return nil ;
}
+ (id) new
{
[self privateNew ] ;
return nil ;
}
+ (void) privateNew
{
NSException *myExp ;
myExp = [ NSException exceptionWithName:@"AbstractClass" reason:@"Abstract class cannot be instantiated" userInfo:nil ] ;
[myExp raise] ;
}
- (void) name: (NSString *) s
{

name = s ;
}

- (NSString *) name ;
{ return name ; }

- (BOOL) isFemale
{ [self subClassResponsibility] ; }

- (BOOL) isMale
{ [self subClassResponsibility] ; }

- (void) subClassResponsibility
{
NSException *myExp ;
myExp = [ NSException exceptionWithName:@"SubclassResponsibility" reason:@"should be implemented in subclass" userInfo:nil ] ;
[myExp raise] ;
}
@end


Already a few comments on this class :

First of all this is an abstract class, this means that is not ment to have instances. In Objective-C their is no language construct that indicates that a class is abstract.
Thats why I overload the 'new' message. I somebody sent's a new message to the class Human , I'll raise an exception.

Another element are the isFemale and isMale methods (or messages). These methods are supposed to be implemented by the subclasses of Human.

So my 'good' practice is to raise an exception (subclassresponsibility) whenever a subclass does not implement a method.

For those with a Smalltalk background , yes I know , I 'stole' that good practice from Smalltalk. I find this very handy especially when I develop frameworks which must be used by other people; then at runtime at least they known that they forgot to implement something.

I still need to add the code for the 2 other classes Female and Male. I will quickly share the code now and give my comments tomorrow :

The interface for Female (pretty empty no ?)

#include "Human.h"

@interface Female : Human {

}

@end


and the implementation of it

#import "Female.h"


@implementation Female

+ (id) new
{
return [[ self alloc] init ] ;
}

+ (id) new: (NSString *) s
{
Female *anInstance ;

anInstance = [[ self alloc] init ] ;
[anInstance name: s] ;
return anInstance ;
}

- (BOOL) isMale
{
return NO ;
}

- (BOOL) isFemale
{
return YES ;
}
@end


And the interface for Male (also pretty empty)

#import "Human.h"

@interface Male : Human {

}

@end


And the corresponding implementation

#import "Male.h"
@implementation Male

+ (id) new
{
return [[self alloc] init ] ;
}
+ (id) new: (NSString *) s
{
Male *anInstance ;

anInstance = [[ self alloc] init ] ;
[anInstance name: s] ;
return anInstance ;
}

- (BOOL) isMale
{
return YES ;
}

- (BOOL) isFemale
{
return NO ;
}

@end


As you can see , both the Female and Male classes are pretty simple. They both implement the isMale and isFemale method in a different way.
Now with these 3 classes we have more or less implemented the core concepts of OO (more concepts will follow later on).
You have a super class (Human) which understands 4 messages (name, name:, isFemale, isMale). You have 2 subclasses (Male, Female) which has a different implementation for the messages isFemale and isMale.
I also introduced 2 types of messages (lets call them methods now) : class methods and instance methods.

In a next blogmessage I'll explain a bit more on the 'syntax sugar' of this Objective-C implementation